📐 "First 50 Enterprise Queries Get Custom 3D Warehouse Design" Plan

Stop Wasting Your Warehouse Height: A Step-by-Step Guide to Installing Heavy-Duty Beam Racking for Maximum Vertical Storage (Save 30% on Floor Space Cost)
Article Summary: This comprehensive guide reveals how to transform your warehouse from a sprawling, inefficient operation into a high-density storage powerhouse by properly installing heavy-duty beam racking. Most facilities utilize only the first 4-5 meters of available height, leaving the upper two-thirds of their cubic space completely empty. This is financial negligence.
By following the systematic installation protocols outlined here—covering everything from pre-installation site analysis and seismic anchoring techniques to beam connection integrity and load distribution calculations—warehouse operators can realistically reclaim 30% or more of their effective storage capacity without spending a dime on building expansions.
This complete beam racking installation guide walks through the engineering principles, safety mandates from OSHA and ANSI, and the step-by-step mechanical procedures required to safely install beam racking that reaches for the sky. Whether managing a rapidly growing logistics hub or overseeing a facility in emerging markets across Southeast Asia, the Middle East, or Latin America, this technical roadmap provides the knowledge to stop wasting vertical real estate and start stacking profits.

Introduction: The Vertical Blind Spot in Modern Warehousing
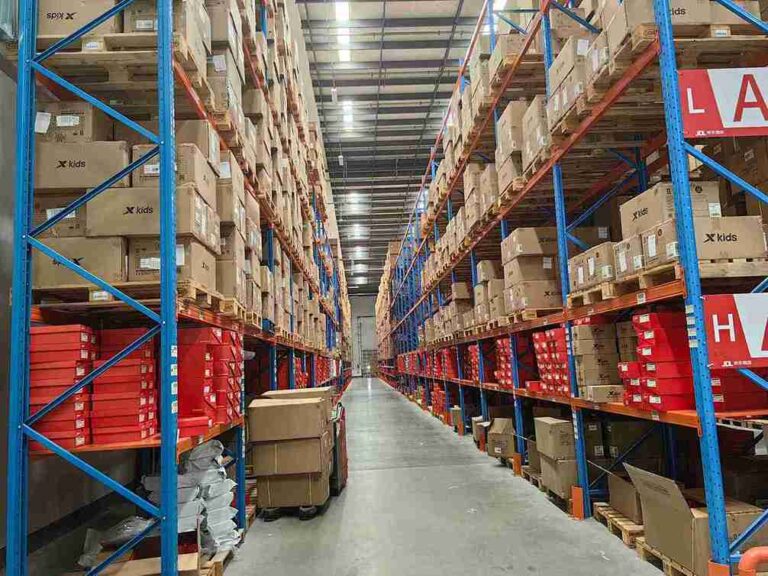
Walk into almost any warehouse across Southeast Asia, the Middle East, or Latin America, and one will witness the same expensive phenomenon: a cavernous building with 10, 12, or even 15 meters of clear height, yet storage effectively stops at the 4-meter mark. This is the vertical blind spot, and it is quietly bleeding capital from operations that have never consulted a proper beam racking installation guide to address the inefficiency.
The concept of vertical stacking is deceptively simple: store goods above one another using engineered racking systems to maximize the cubic volume of any facility . Yet, the execution remains elusive for many operators across developing logistics markets. The reality check is brutal. If a warehouse has a clear height of 10 meters but only stores to 4 meters, the operation is wasting 60% of the cubic volume already being paid for through rent or mortgage payments. The facility is essentially renting a three-story building and only using the ground floor—a problem any detailed beam racking installation guide can help solve.
This beam racking installation guide is laser-focused on fixing that expensive oversight. Heavy-duty beam racking, when installed correctly following a comprehensive beam racking installation guide, becomes the skeleton of warehouse transformation. It allows operations to punch through the ceiling of current capacity limitations, quite literally. By moving storage vertical, facilities consolidate their footprint. That consolidation frees up floor space—often 30% or more—which can then be repurposed for production, packing, value-added services, or simply avoiding the massive capital expenditure of a new building .
But here is the non-negotiable caveat that every credible beam racking installation guide must emphasize: height introduces risk. A four-meter rack tipped over by a forklift is a bad day. A twelve-meter rack collapsing due to improper installation is a catastrophic event that endangers lives and entire businesses. Therefore, this beam racking installation guide is not just about putting up shelves; it is about engineering a vertical storage solution that is safe, compliant, and optimized for the long haul. The process will be dissected from the concrete floor up, ensuring that when reaching for the sky, the operation stands on an unshakable foundation—a principle any reliable beam racking installation guide prioritizes above all else.
Phase 1: Pre-Installation Assessment — The Science Before the Sweat
Before a single beam is lifted or a single anchor is drilled, a rigorous assessment of the facility and its inventory is mandatory. Skipping this phase is the primary cause of catastrophic failures down the line, which is why every authoritative beam racking installation guide begins not with tools, but with analysis.
Evaluating Structural Capacity and Clear Height
The first question addressed in any professional beam racking installation guide is not “how tall do we want to go?” but “how tall can we go safely?” The available clear height is not simply the distance from the floor to the roof trusses. One must account for mandatory clearances that cannot be invaded, a critical detail often overlooked by those who skim their beam racking installation guide.
Obstruction Clearances: Facilities need to maintain a minimum clearance from overhead obstructions. This is particularly critical for fire safety. Automatic sprinkler systems require adequate flue space—typically a minimum of 3 inches above and to the sides of each pallet—to ensure water can penetrate and suppress a fire effectively . Blocking sprinklers with product stacked too high renders fire suppression systems useless. Additionally, lighting, HVAC ducts, and building structural supports must be considered. The practical maximum usable height is usually 0.5 to 1 meter below the lowest overhead obstruction, a calculation any thorough beam racking installation guide will include.
Floor Flatness and Composition: Heavy-duty racking is merciless to uneven floors, a truth every experienced installer knows from following a proper beam racking installation guide. The entire load of the rack and its inventory is transferred through the baseplates to the floor. If the floor is not flat, the load distribution becomes uneven, inducing stress into the frame that can lead to buckling. The standard tolerance for floor flatness is critical; shimming will be required in areas where the floor deviates . A quality beam racking installation guide always emphasizes this pre-condition.
Furthermore, the floor must be engineered to handle the point loads. A fully loaded upright can exert tremendous pressure on the concrete. Verification of the concrete’s thickness, compressive strength (PSI), and the presence of reinforcing steel (rebar) or post-tensioning cables is essential. Drilling anchors into a slab not designed for such loads can compromise the floor’s integrity, which is why a professional beam racking installation guide always recommends a structural engineer’s evaluation before proceeding .
Inventory Profiling: Matching Rack Configuration to Product
Operations do not build a rack system for “pallets”; they build it for their pallets. This is where many generic installations fail to maximize space, and where a customized beam racking installation guide proves its value.
Pallet Size and Weight: Measuring pallets is step one. Are they standard 1200mm x 1000mm? Are they wing pallets with protruding edges? The beam length is determined by the number of pallets intended for storage per bay. A standard rule, repeated in every reliable beam racking installation guide, is to allow for 3 inches of clearance around the pallet for safe placement and retrieval . The beam capacity must be calculated based on the weight of each pallet multiplied by the number of pallets in that bay. Remember, the beam holds the load, and the uprights hold the beams—a fundamental relationship any beam racking installation guide must explain clearly.
SKU Velocity and the ABC Analysis: Not all inventory deserves to be in the most accessible spots. Implementing a simple ABC analysis based on the Pareto principle will dictate vertical slotting strategy . This strategic approach is a hallmark of advanced beam racking installation guide content.
A Items (Fast Movers): These should be stored at lower levels (waist to chest height) to minimize pick times and reduce reliance on equipment for every interaction.
B Items (Medium Velocity): These occupy the middle levels, accessible by standard reach trucks.
C Items (Slow Movers / Reserve Stock): This is where vertical stacking pays its biggest dividend. These items belong in the upper echelons of the racking. They are accessed less frequently, so the extra travel time is an acceptable trade-off for reclaiming valuable floor space .

Phase 2: Selecting the Right Beam Racking Configuration for Maximum Height
The term “beam racking” encompasses several distinct configurations, each with a different density and selectivity profile. To achieve that 30% space savings, one must choose the system that aligns with the inventory profile, a decision-making process any comprehensive beam racking installation guide facilitates.
Standard Selective Racking: The Baseline
This is the most common system. Every pallet has its own dedicated spot and is 100% accessible without moving other pallets. While it offers maximum selectivity, it is the least space-efficient in terms of density because it requires an aisle for every row of racks. For maximizing vertical storage, selective racking is often the starting point, but it can be optimized with narrow aisle or very narrow aisle (VNA) configurations . A good beam racking installation guide will explain these options in detail.
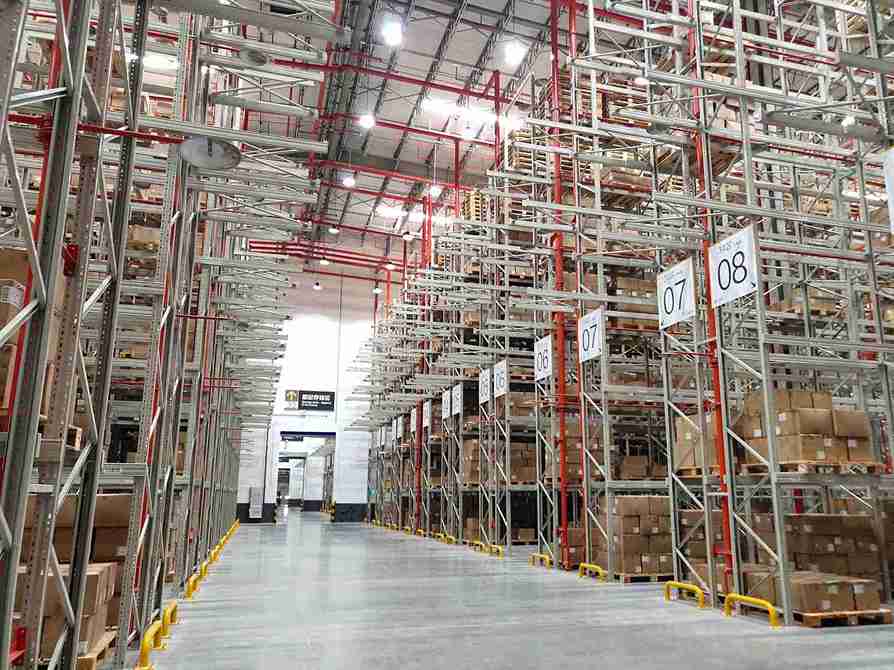
Narrow Aisle (NA) and Very Narrow Aisle (VNA): By reducing aisle width from the standard 3-3.5 meters down to 1.6-1.8 meters (NA) or even 1.5-1.7 meters (VNA), operations can reclaim massive amounts of floor space and reallocate it to storage. VNA systems, often reaching heights of 12-16 meters, require specialized wire-guided or rail-guided trucks, but they deliver the highest density while maintaining 100% selectivity . This is the sweet spot for operations that need both height and accessibility, and a sophisticated beam racking installation guide will help evaluate the trade-offs.
High-Density Systems: Drive-In, Push-Back, and Pallet Flow
When large quantities of the same SKU are present (as in cold storage or bulk commodity storage), aisles can be eliminated entirely within the storage block. This section of any advanced beam racking installation guide addresses density optimization.
Drive-In Racking: Forklifts drive directly into the rack structure to deposit or retrieve pallets. This system maximizes density—utilizing 85-90% of the floor space—by storing pallets 3-10 positions deep. However, it operates on a Last-In, First-Out (LIFO) basis and has reduced selectivity . It is ideal for seasonal goods or large batches where rotation is not critical, and a thorough beam racking installation guide will note these application-specific considerations.
Push-Back and Pallet Flow Racking: These systems use depth to increase density. Push-back racking uses nested carts on a slight incline; loading a new pallet pushes the previous one back (LIFO). Pallet flow racking uses gravity rollers to move pallets from a loading end to a picking end, providing automatic First-In, First-Out (FIFO) rotation . These are excellent for high-turnover products and date-sensitive inventory, effectively using the building’s depth to supplement its height—another strategic option a complete beam racking installation guide should cover.
Multi-Tier Systems: Creating Floors Within Floors
For lighter goods or case picking, consider multi-level racking systems. These are essentially mezzanine structures built from racking components, creating multiple storage levels on the same footprint. Each additional level effectively doubles the usable space on that floor area. This is not just for pallets; it can integrate shelving for small parts, creating a highly dense, multi-level picking environment that fully utilizes every cubic meter from the floor to the ceiling. An authoritative beam racking installation guide will present this as a viable option for operations with diverse inventory profiles.
Phase 3: The Anatomy of Heavy-Duty Beam Racking Installation
Now the focus shifts to physical execution. This section details the mechanical process of installing the racking with the precision required for safe high-level storage, representing the core of any credible beam racking installation guide.
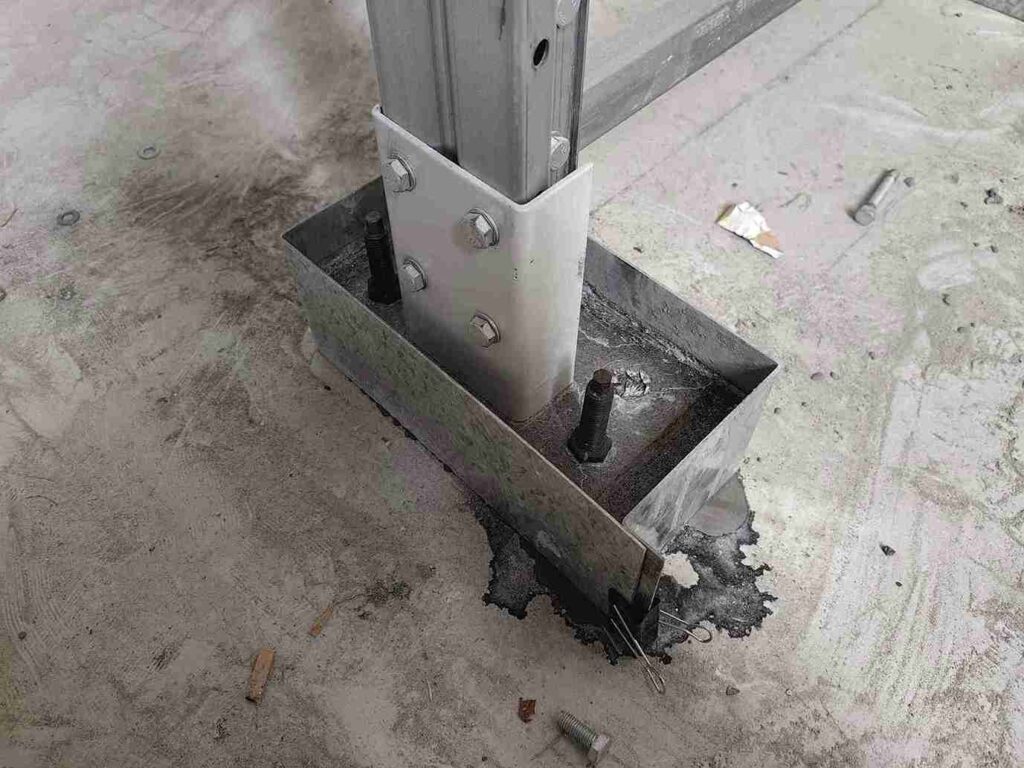
Anchoring: The Non-Negotiable Foundation
An unanchored rack is not a rack; it is a hazard. Beam racking anchoring methods are the backbone of warehouse safety, preventing tip-overs from uneven loads or forklift impacts . OSHA mandates that all racking must be anchored to the floor, a requirement every responsible beam racking installation guide must emphasize .
Step 1: Layout and Marking
Using a laser level and the engineered layout drawings, precisely mark the center points for every anchor hole. Accuracy here prevents alignment issues later, a detail stressed in any professional beam racking installation guide. The location of underground utilities, conduits, or radiant heat pipes must be verified before drilling. Ground-penetrating radar is the safest tool for this purpose .
Step 2: Drilling
Using a rotary hammer drill with a carbide-tipped bit matching the exact diameter of the anchor, drill to the depth specified by the engineer—typically a minimum of 3-4 inches of embedment into the concrete . This depth is critical for achieving the required pull-out resistance, a specification no beam racking installation guide should omit.
Critical Step: Clean the hole thoroughly. Use compressed air to blow out all dust and debris, and then use a wire brush to ensure the interior walls are clean. Dust left in the hole can reduce anchor holding strength by up to 60%, a warning that appears in every quality beam racking installation guide .
Step 3: Anchor Selection and Installation
There are several proven beam racking anchoring methods, and the choice depends on floor condition and load requirements :
Concrete Expansion Anchors (Mechanical): These are the industry standard for permanent installations. As the nut is torqued, the base of the anchor expands, creating a mechanical lock against the concrete. These are ideal for heavy loads and standard conditions, and they are the first recommendation in any standard beam racking installation guide.
Chemical/Epoxy Anchors: These involve inserting a threaded rod into a hole filled with a two-part epoxy cartridge. The epoxy bonds chemically with the concrete and the rod. These are superior for use in cracked concrete, in high-vibration environments (like near truck wells), or where edge distances are tight . They require a full curing time (often 24-48 hours) before load can be applied, a critical timeline any beam racking installation guide must specify.
Step 4: Torquing and Inspection
Once the anchors are set, use a calibrated torque wrench to tighten each nut to the manufacturer’s specified value—typically 25-30 ft-lbs for standard applications . Under-torquing means the anchor is not fully engaged; over-torquing can damage the threads or even fracture the concrete. After 72 hours, perform a re-torque check, as initial settling can sometimes loosen the connection . Never, under any circumstances, skip anchors. A missing anchor at the base of a column creates a pivot point, making the entire structure vulnerable to collapse from lateral forces—a warning repeated in every responsible beam racking installation guide.
Assembling Upright Frames
With the anchors prepped, the upright frames can be assembled and erected. This is best done lying down, following the sequence outlined in any detailed beam racking installation guide.
Frame Assembly:
Lay the two columns (uprights) on the ground parallel to each other. Attach the horizontal and diagonal bracing members according to the engineered pattern . The bracing is not just for show; it provides the structural rigidity that prevents the frame from folding under load or swaying from seismic or equipment impacts . Ensure all bolts are snug but not fully torqued until the frame is raised and plumbed. A proper beam racking installation guide will emphasize this sequential approach.
Erecting and Plumbing:
Lift the assembled frame into position over the anchor bolts. Use guy lines or a team to hold it steady. Place a high-quality spirit level or, preferably, a digital inclinometer on the columns. The rack must be perfectly plumb (vertical) in both the front-to-back and side-to-side directions. The allowable tolerance is typically quite strict (e.g., 1 inch in 240 inches of height or 1/8″ per 10 feet) .
Shimming: If the floor is uneven, steel shims must be used between the baseplate and the floor to achieve plumbness. These shims must be full contact, not just random scraps of metal . Once the frame is perfectly plumb, the anchor nuts can be torqued down hard, sandwiching the baseplate and shims firmly to the floor. This meticulous process is the hallmark of a quality beam racking installation guide.
Installing the Beams: The Horizontal Backbone
With the uprights standing tall and secure, it is time to install the beams, which will bear the weight of the inventory. This is often the most anticipated section of any beam racking installation guide.
Beam Placement:
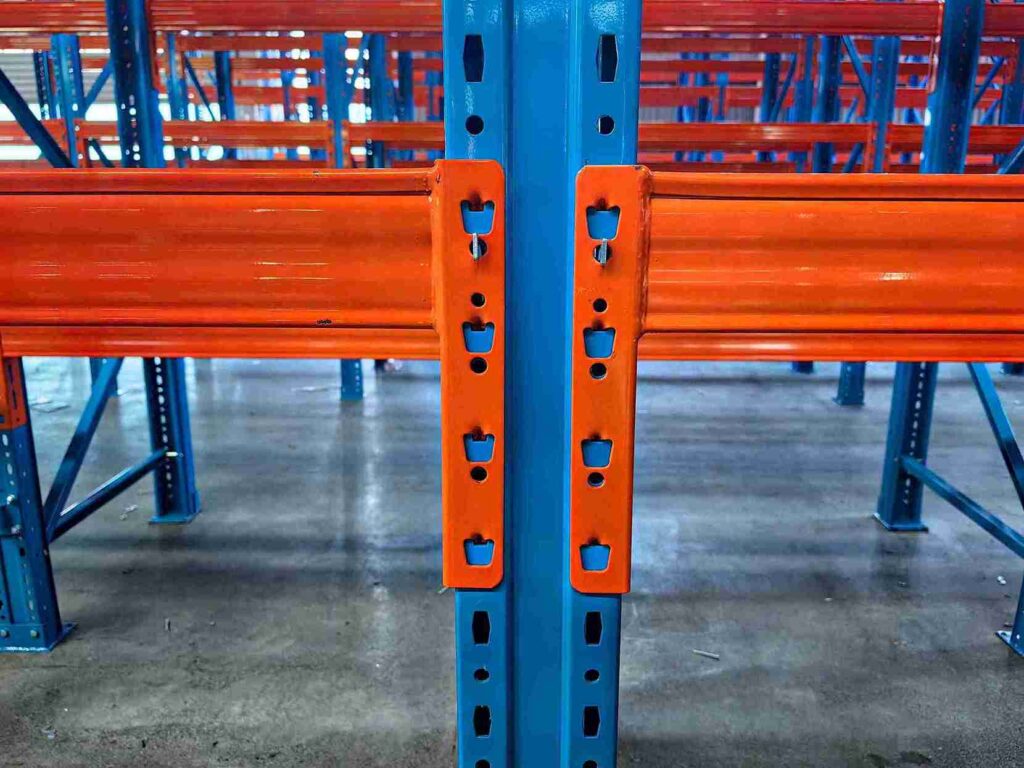
Beams are attached to the uprights via integral connectors (often called beam clips or end plates) that feature integral tabs or hooks. These connectors engage with slots (keyed apertures) punched into the upright columns, such as teardrop or keyhole patterns . To attach, tilt the beam upward, insert the top tabs of the connector into the upper portion of the slots, and then lower the beam until the bottom hooks engage . One should hear a solid “click” or feel the beam seat firmly. A comprehensive beam racking installation guide will describe this tactile feedback.
The Critical Role of Beam Locking Devices (Safety Pins):
This is perhaps the most overlooked safety step in the entire installation process, which is why any reputable beam racking installation guide dedicates significant attention to it. Once the beam is seated, the beam locking device—often called a safety pin, J-pin, or bolt—must be installed. This small component passes through a hole in the beam connector and the upright column, preventing the beam from being accidentally dislodged by upward force from a forklift or shifting load .
OSHA and RMI (Rack Manufacturers Institute) standards are explicit: beam-locking devices must be capable of resisting an upward force of 1,000 pounds per connection without failure . A beam without a safety pin is a disaster waiting to happen. It takes only one clumsy forklift operator lifting a pallet that snags on the beam above to pop that beam off its perch, leading to a potential domino effect of falling pallets and collapsed racks. Never use aftermarket bolts or generic hardware to replace missing safety pins . These pins are engineered as part of the system, often designed with specific tolerances that generic parts won’t meet—a critical warning in any authoritative beam racking installation guide.
Spacing and Leveling:
Install all beams at the levels determined by the inventory profile. Ensure that beams on opposite sides of the aisle are level with each other. The beam spacing must be consistent and according to the engineered design . Removing a lower beam, for instance, increases the unsupported length of the column, drastically reducing its load capacity—even if fewer pallets are being stored. Any change to the “as-built” beam configuration requires re-certification by a qualified engineer, a point any responsible beam racking installation guide will stress .
Phase 4: Load Distribution and Safety Protocols
Installation is not complete until the system is loaded correctly. Proper loading is the daily execution of the installation’s integrity, and ongoing guidance from a beam racking installation guide remains relevant throughout the system’s life.
Understanding Load Capacity Labels
Every beam level should have a visible load capacity label, or the system should have prominent plaques at the end of each row indicating the maximum allowable load per beam level . These are not suggestions; they are legal and safety limits.
Uniformly Distributed Load (UDL): Assume the load is evenly distributed across the entire beam length. A point load (a very heavy object sitting in the middle of the beam) is far more stressful than the same weight spread out .
Deflection Limits: Under load, beams will deflect (bend) slightly. This is normal. However, there is a limit. The maximum allowable deflection is typically L/180, where “L” is the length of the beam . If a permanent bend (a “set”) is noticed in a beam after unloading, it has been overstressed and must be replaced immediately.
The Golden Rules of Pallet Placement
How pallets are placed on the beams is as important as the beams themselves—a lesson reinforced in any quality beam racking installation guide.
Avoid Pallet Overhang:
Pallets must be placed so that they are supported evenly by both the front and rear beams. Excessive pallet overhang—where the pallet extends too far past the beam—means the load is not being transferred directly to the structure. This can cause the beam to twist or the pallet to tip. The maximum recommended overhang is typically 4 inches, but the ideal is between 2 and 4 inches of support . If the pallet is too small for the beam depth, it risks falling through. If it’s too large and overhangs excessively, beam failure becomes a risk.
Maintain Flue Spaces:
The importance of maintaining required vertical and horizontal flue spaces cannot be overstated. Blocking these spaces with product not only invites fire suppression failure but also risks product damage. If the overhead beam is too close to the pallet below, lifting a pallet could push up against the beam above, potentially dislodging it if safety pins are missing .
Prohibited Practices: What Operations Must Never Do
No Welding: Do not attempt to repair damaged racking with welding. Welding alters the heat treatment and metallurgical properties of the steel, creating weak points that can lead to sudden failure .
No Mixing Manufacturers: Beams and uprights from different manufacturers are not engineered to work together. The dimensions, steel gauges, and connection mechanisms vary. Mixing components compromises the structural integrity of the entire system .
No Loading on Bracing: The horizontal and diagonal braces on uprights are for structural support of the frame, not for storing product. Leaning heavy items against this bracing can bend it, crack welds, and destroy the frame’s ability to resist racking forces.
Phase 5: Wire Mesh Decking and Specialized Safety Applications
As operations maximize vertical storage, additional safety considerations come into play that extend beyond the basic beam racking installation guide. One such consideration is the use of wire mesh decking, particularly in rack tunnel applications.
The Role of Wire Mesh Decking in Rack Tunnels
When warehouse layouts incorporate rack tunnels—passageways that allow pedestrians to move from one aisle to another through the rack structure—additional fall protection becomes necessary. According to safety experts, wire mesh rack decking plays a crucial role in these configurations .
While OSHA has issued general regulations regarding industrial shelving, Article 1910.176(b) states that warehouse management is required to take all necessary measures to protect workers. Using a wire mesh partition on the first beam level of a rack tunnel is one way to help protect pedestrians . The standard requires that “storage of material shall not create a hazard. Bags, containers, bundles, etc., stored in tiers shall be stacked, blocked, interlocked, and limited in height so that they are stable and secure against sliding or collapse.”
ANSI Requirements for Fall Protection
The ANSI MH16.1 standard, the rack design code specified in the International Building Code (IBC), states that protection may be required where operations would require horizontal or vertical safety barriers to prevent product from falling . According to the Product Fall Protection Commentary within ANSI MH16.1, locations where people could be situated, or areas where falling product could cause property damage or present a safety hazard, should be identified by the owner and brought to the attention of the registered design professional.
Best Practices for Wire Mesh Decking Installation
When incorporating wire mesh decking into a beam racking installation guide, several best practices emerge. Although waterfall-type wire mesh will not laterally move and cannot simply fall off the rack, it is better to attach them to beams as they sometimes can get lifted by pallets during handling operations . Regular inspections should be conducted to identify possible hazards, and fall protection accessories such as safety bars and wire mesh partitions should be used where objects could fall and potentially injure workers .
Phase 6: Advanced Beam Racking Anchoring Methods for Specialized Environments
For operations in emerging markets across Southeast Asia, the Middle East, and Latin America, understanding specialized beam racking anchoring methods is essential for safety and compliance. This section expands on the foundational anchoring discussion with advanced considerations.
Seismic Anchoring for Earthquake Zones
In regions prone to seismic activity, standard anchoring may not suffice. Advanced beam racking anchoring methods for earthquake zones require the use of ductile anchors that can flex under stress without fracturing . Additionally, cross-bracing for lateral stability must be installed to prevent rack collapse during ground movement. Any comprehensive beam racking installation guide serving markets in seismically active areas must address these specialized requirements.
Reinforced Anchoring for High-Impact Areas
In busy warehouses where forklift traffic is constant, reinforced anchoring strategies are necessary. These advanced beam racking anchoring methods include adding steel column guards to protect baseplates from impact and using double-anchor configurations at critical load points . Operations should consider these upgrades when following a beam racking installation guide for high-traffic facilities.
Chemical Anchoring in Problematic Concrete
When floor concrete is cracked, aged, or of questionable quality, chemical anchoring systems offer superior performance. These beam racking anchoring methods involve injecting two-part epoxy into drilled holes before inserting threaded rods . The chemical bond provides excellent pull-out resistance even in suboptimal concrete conditions. However, as any thorough beam racking installation guide will note, curing time of 24-48 hours must be respected before applying load.
Load Capacity Calculations for Anchoring
Professional beam racking anchoring methods require precise engineering calculations. The required anchor strength can be determined using this formula: (Rack Weight + Max Load) × Safety Factor (1.5-2.0) . For example, with a rack weight of 6,000 lbs, maximum load per bay of 25,000 lbs, and a safety factor of 1.8, the total anchor strength needed would be (6,000 + 25,000) × 1.8 = 55,800 lbs. Over-engineering by 20% to account for dynamic loads is recommended —advice any authoritative beam racking installation guide should include.
Phase 7: Long-Term Maintenance and Inspection Regimen
A racking system is not “install and forget.” It requires ongoing vigilance to ensure it remains safe as it ages and endures daily operational abuse. This section of the beam racking installation guide addresses the system’s entire lifecycle.
Informal Daily/Weekly Inspections
Floor staff—forklift operators and pickers—should be empowered as the first line of defense. Train them on what to look for, as they are the ones who will see an impact happen or notice a new bend .
Check for Visible Damage: Look for dents, bends, or shearing on beams and uprights caused by forklift impacts .
Verify Safety Pins: Ensure all beam locking devices are present and fully engaged .
Check for Obstructions: Ensure flue spaces are clear and aisles are free of debris .
Look for Corrosion: In humid climates or facilities storing chemicals, keep an eye out for rust, especially on the critical connection points like beam clips and baseplate welds .
Annual Professional Inspections
At least once a year, a qualified racking inspector or structural engineer must perform a comprehensive inspection. This is non-negotiable for compliance with most safety standards (like those from RMI or SEMA) and insurance requirements .
Plumbness Check: The inspector will re-check the vertical alignment of all uprights .
Anchor Torque Test: They will spot-check anchor bolts to ensure they still meet torque specifications .
Structural Integrity Assessment: They will assess the severity of any damage found (dents, bends, corrosion) and determine whether components need to be repaired (by engineered solution) or replaced .
Documentation: All inspections must be logged and kept on file. This documentation is proof of due diligence in the event of an OSHA inspection or an accident .
Responding to Impact
Forklift impacts are inevitable. When one happens, do not just glance at the beam and assume it is fine. Any impact must be reported and inspected. A beam that looks superficially fine may have a cracked weld or a deformed connector that will fail under load weeks later . Implement a policy where drivers report all contact, and designate a responsible person to assess the damage immediately.
Phase 8: Beam Types, Selection Criteria, and Engineering Considerations
Understanding the various beam types and their engineering specifications is essential for anyone following a beam racking installation guide to make informed procurement decisions.
Pallet Rack Beam Shapes and Their Applications
There are three essential facts about pallet rack beams, the most prominent being that they hold the weight of inventory between the upright frames . Yet, there are two less obvious roles beams play that are often overlooked in basic beam racking installation guide content.
First, beams provide horizontal rigidity to the racking system, preventing lateral displacement or swaying under seismic activity and dynamic forces, such as forklift impacts . Second, they enhance the torque resistance of the upright. Pallet rack beams contribute to overall structural stability by bracing the upright columns and reducing the risk of deformation or buckling under concentrated vertical loads at lower levels .
Common beam shapes include box and step designs. Box beams do not have an interior step slot, and if wire decking is used, it is secured on top of these beams. Step beams have a step that is used as a slot to support crossbars and wire decking . It is critical to adhere to the beam shape specified in the original system design, as substituting a different shape can compromise the beam’s load capacity and structural integrity.
Beam Length and Gauge Selection
Pallet rack beams come in various lengths, and selecting the appropriate length is essential for accommodating pallets. Typically, a beam should allow for 3 inches of clearance around the pallet . As the length of the beam increases, the beam gauge also needs to be increased to ensure the beam can support the load. The engineer calculates the total load, and it is critical to ensure that these specifications are adhered to in order to maintain the system’s structural integrity .
The type of steel and thickness used in pallet rack beams affects load-bearing capacity. Since steel weights and gauges are not visually identifiable, always refer to the specifications provided in the original engineering plans . RMI recommends against mixing pallet rack beams from different manufacturers, ensuring that all replacement or new beams meet the original engineering specifications.
Phase 9: Common Installation Mistakes and How to Avoid Them
Even experienced installers can make errors. This section of the beam racking installation guide highlights the most frequent mistakes and provides solutions to avoid them.
Mistake #1: Improper Beam Leveling
Problem: Uneven beams cause pallets to tilt or fall, creating safety hazards and potential inventory damage .
Solution: Always use a laser level during installation and verify beam height consistency across all bays.
Mistake #2: Overloading or Uneven Weight Distribution
Problem: Exceeding load limits leads to structural failure, beam deformation, and potential collapse .
Solution: Follow manufacturer guidelines strictly and ensure all loads are evenly distributed across beam levels .
Mistake #3: Skipping Safety Accessories
Problem: Missing guards, safety pins, or braces increases accident risks and compromises structural integrity .
Solution: Install all recommended safety components and verify that beam locking devices are present on every connection .
Mistake #4: Ignoring Floor Level Checks
Problem: Installing on uneven floors without proper shimming creates rack instability and uneven load distribution .
Solution: Conduct thorough floor flatness assessment before installation and use engineered shims where necessary .
Mistake #5: Over-tightening or Under-tightening Bolts
Problem: Over-tightening causes metal fatigue and cracking; under-tightening leads to gradual loosening and connection failure .
Solution: Use a calibrated torque wrench and follow manufacturer specifications precisely .
Mistake #6: Reusing Damaged Components
Problem: Installing beams or uprights with visible damage compromises the entire system’s integrity .
Solution: Inspect all components before installation and reject any parts that are damaged or distorted .
Mistake #7: Failing to Account for Seismic Requirements
Problem: In earthquake-prone regions, standard anchoring may be insufficient, leading to catastrophic collapse during seismic events .
Solution: Consult local building codes and engineering specifications for seismic anchoring requirements .
Phase 10: Special Considerations for Emerging Markets
For operations in Southeast Asia, the Middle East, Africa, and Latin America, additional factors must be considered when following a beam racking installation guide.
Climate and Corrosion Resistance
In tropical and coastal environments, humidity and salt air accelerate corrosion. A beam racking installation guide for these regions should specify galvanized components or specialized coatings to protect against rust . Particular attention should be given to the lowest section of upright frames and beam connectors, as corrosion in these areas can compromise structural integrity.
Local Building Codes and International Standards
While OSHA and ANSI standards provide excellent benchmarks, local building codes may have specific requirements. A comprehensive beam racking installation guide should recommend consulting with local structural engineers who understand regional seismic zones, wind loads, and construction practices .
Skilled Labor Availability
In some emerging markets, experienced rack installers may be scarce. A practical beam racking installation guide should emphasize thorough training programs, detailed documentation, and the importance of supervision during installation. Video tutorials and step-by-step visual guides can supplement written instructions for teams with varying experience levels .
Supply Chain Considerations for Replacement Parts
When operating in remote locations, obtaining replacement beams or safety pins may take weeks. A forward-thinking beam racking installation guide should recommend maintaining an inventory of critical spare parts, including extra safety pins, beam clips, and anchor bolts, to minimize downtime after impacts or damage.
Conclusion: Reaching Vertical Potential Safely and Profitably
The journey to maximizing a warehouse’s potential is a vertical one. By implementing the strategies and procedures outlined in this comprehensive beam racking installation guide, operations are not just installing shelves; they are engineering a safer, more profitable environment. The potential to save 30% on floor space costs is not a marketing gimmick; it is a mathematical reality for the vast majority of warehouses that currently operate with a ground-floor-only mentality.
However, it must be reiterated that height without integrity is a liability. The meticulous attention to pre-installation planning, the precision of proper anchoring, the critical role of beam safety pins, the discipline of correct loading, and the vigilance of ongoing maintenance are what separate a world-class storage solution from a catastrophe waiting to happen. The beam racking system is the backbone of the supply chain. Treating its installation and maintenance with the engineering respect it deserves will support business growth for decades to come.
Every warehouse manager, logistics professional, and facility owner should commit to following a detailed beam racking installation guide for every project, whether a small expansion or a greenfield facility. The investment in proper procedures pays dividends in safety, efficiency, and profitability. Stop wasting the space above your head. The profit margin saved could be your own.
Frequently Asked Questions (FAQs)
1: How does beam racking installation differ for cold storage warehouses compared to ambient temperature facilities?
A: Cold storage environments present unique challenges for beam racking installation. The constant temperature fluctuations and condensation can accelerate corrosion, so galvanized or specially coated components are recommended. Additionally, the concrete floor in freezers may contain heating elements to prevent frost heave, requiring careful coordination with building engineers before drilling anchors. The beam racking installation guide for cold storage should also account for potential contraction and expansion of materials and specify appropriate anchor types that maintain holding strength at low temperatures .
2: Can existing beam racking be modified to accommodate taller loads after initial installation?
A: Yes, beam heights can be adjusted, but this must be done following proper engineering protocols. Any modification to beam spacing should be reviewed by a qualified structural engineer, as changing the spatial configuration directly impacts the overall load capacity and stability of the racking system . Larger beam gaps can reduce horizontal rigidity, causing upright columns to experience more torque. A responsible beam racking installation guide will always recommend consulting an engineer before making such changes and ensuring that all beam locking devices are properly re-engaged after adjustment .
3: What are the specific anchor requirements for beam racking installation in mezzanine structures?
A: Mezzanine structures built from racking components require enhanced anchoring due to the additional dynamic loads from personnel and potential vibration. The beam racking installation guide for mezzanines typically specifies larger diameter anchors (minimum 5/8 inch), deeper embedment (4-6 inches into concrete), and more frequent anchor placement. Additionally, the connection points between the mezzanine deck and the rack structure must be engineered to transfer lateral loads properly. Chemical/epoxy anchors are often preferred in these applications for their superior holding strength .
4: How should warehouse operators handle beam racking installation in facilities with post-tensioned concrete slabs?
A: Post-tensioned concrete slabs require extreme caution during beam racking installation. Drilling into these slabs without precise knowledge of cable locations can sever tensioned cables, causing catastrophic slab failure. Before any drilling, a thorough scan using ground-penetrating radar must be conducted to map cable locations . Anchor placement must avoid these cables entirely. In some cases, surface-mounted anchoring systems or adhesive anchors that do not penetrate deeply may be specified. This specialized application absolutely requires oversight by a structural engineer familiar with post-tensioned construction.
5: What is the protocol for beam racking installation when dealing with non-standard pallet sizes or unusual product shapes?
A: Non-standard pallets and unusual loads require customized engineering during beam racking installation. The standard 3-inch clearance rule may need adjustment based on product dimensions and stability . For long, flexible items like piping or lumber, cantilever attachments or specialized supports may be necessary. The beam racking installation guide should specify that all custom configurations be reviewed by the rack manufacturer or a structural engineer to verify that beam loads, upright capacities, and anchoring requirements are adequate for the specific application .
6: How does seismic activity risk affect beam racking installation requirements in different global regions?
A: Seismic risk dramatically impacts beam racking installation specifications. In high-risk zones such as parts of Southeast Asia, the Middle East, and Latin America, additional requirements include deeper anchor embedment, specialized ductile anchors that flex without fracturing, and supplemental cross-bracing for lateral stability . The beam racking installation guide for seismic zones must reference local building codes and potentially require seismic base isolation systems for extremely tall installations. Annual inspections should specifically check for any signs of movement or stress that could indicate vulnerability to future seismic events.
7: What documentation should be maintained after completing a beam racking installation?
A: Comprehensive documentation is essential for compliance and future reference. After completing beam racking installation, operators should retain: the original engineered drawings and specifications, anchor torque test records with dates and values, shimming documentation showing where and why shims were used, photographs of the completed installation, beam load capacity labels or row-end plaques documentation, and all inspection reports . This documentation proves due diligence during OSHA inspections or insurance audits and provides baseline data for future inspections to detect changes or damage.
8: Can beam racking installation be performed while the warehouse remains operational, or should areas be closed?
A: While partial operation may continue, safety requires that beam racking installation areas be completely closed to normal traffic. The installation zone should be clearly barricaded with warning signs, and pedestrian pathways must be rerouted. Falling tools, tipping frames, and forklift movement during installation create serious hazards. A thorough beam racking installation guide will recommend scheduling installation during off-hours or weekends in busy facilities to minimize risk. If installation must occur during operations, a dedicated safety monitor should be present at all times to enforce exclusion zones.
9: What are the warning signs that beam racking installation was done incorrectly?
A: Several red flags indicate potential problems with beam racking installation: racks that are visibly out of plumb (leaning), beams that do not sit level, missing or loose safety pins, gaps between baseplates and the floor where shims should be but aren’t, anchor bolts that are not fully torqued or show signs of backing out, and any visible gaps at beam-to-upright connections . If any of these conditions are observed, immediate inspection by a qualified professional is necessary, and the affected area should not be loaded until the installation is verified or corrected.
10: How do local climate conditions in tropical markets affect beam racking installation procedures?
A: Tropical climates with high humidity, monsoon seasons, and temperature extremes require special considerations during beam racking installation. The beam racking installation guide for these regions should specify: corrosion-resistant coatings or galvanized components, additional clearance for wood pallet expansion in humidity, concrete curing verification before anchoring (high humidity can affect curing times), and more frequent post-installation inspections for early signs of rust . In flood-prone areas, baseplates may need to be elevated or specially sealed to prevent water damage to anchors and welds.
If you require perfect CAD drawings and quotes for warehouse racking, please contact us. We can provide you with free warehouse racking planning and design services and quotes. Our email address is: jili@geelyracks.com