📐 "First 50 Enterprise Queries Get Custom 3D Warehouse Design" Plan
The frustration is palpable. You invested in a high-density storage system promising unparalleled efficiency, only to find your warehouse operations choked by a flawed design. Chronic aisle congestion, frequent product damage, and a nagging sense that the system is working against you, not for you, are telltale signs of a fundamental miscalculation. In over 90% of these cases, the root cause boils down to one critical error: incorrect push back racking dimensions. This isn’t merely a matter of a few misplaced measurements; it’s a fundamental misunderstanding of the intricate engineering ballet that allows push back systems to function at peak performance.
At [Geelyracks], with decades of hands-on experience engineering storage solutions for Fortune 500 companies and local distributors alike, we’ve diagnosed and rectified more failed layouts than we can count. This definitive guide is your masterclass in understanding push back racking dimensions, moving beyond simplistic formulas to the profound spatial intelligence required to unlock true warehouse potential. We will dissect every component, every calculation, and every hidden variable that dictates the success of your system. And to translate this knowledge into immediate action, we are providing exclusive access to our proprietary engineering tool—a sophisticated Push Back Racking Calculator designed to give you a precise, data-driven blueprint for your specific facility.

The High Cost of Ignorance: Why Push Back Racking Dimensions Make or Break Your Operation
To the uninitiated, determining push back racking dimensions might seem like a straightforward exercise in arithmetic. This perception is the single greatest source of failure in warehouse planning. The dimensions of a push back system are not static numbers; they represent a dynamic ecosystem where mechanical components, palletized loads, and human operators interact within a confined space.
Getting the push back racking dimensions wrong, even by a few inches, triggers a cascade of operational failures. Aisle width miscalculations force forklift operators into a perpetual dance with disaster, dramatically increasing the likelihood of catastrophic impact with upright frames—damage that is both dangerous and exorbitantly expensive to repair. Incorrect bay depth calculations lead to pallets binding against the rear frame, causing resistance that strains equipment and turns a smooth loading process into a jarring, destructive ordeal. The ultimate irony is that a system chosen for its space-saving prowess ends up squandering both cube and capital.
The correct push back racking dimensions are the difference between a fluid, high-throughput storage solution and an expensive, static obstacle course. Understanding this is the first step toward redemption and efficiency.
An Engineer’s Blueprint: Deconstructing the Components That Define Push Back Racking Dimensions
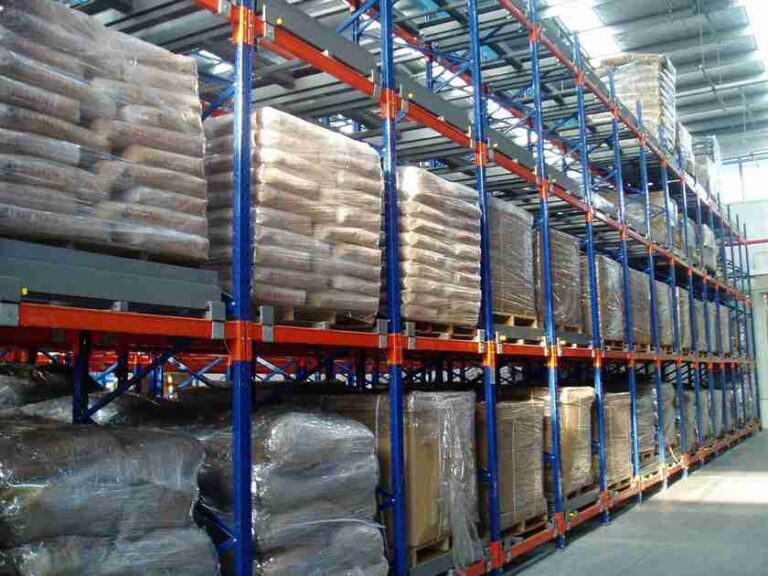
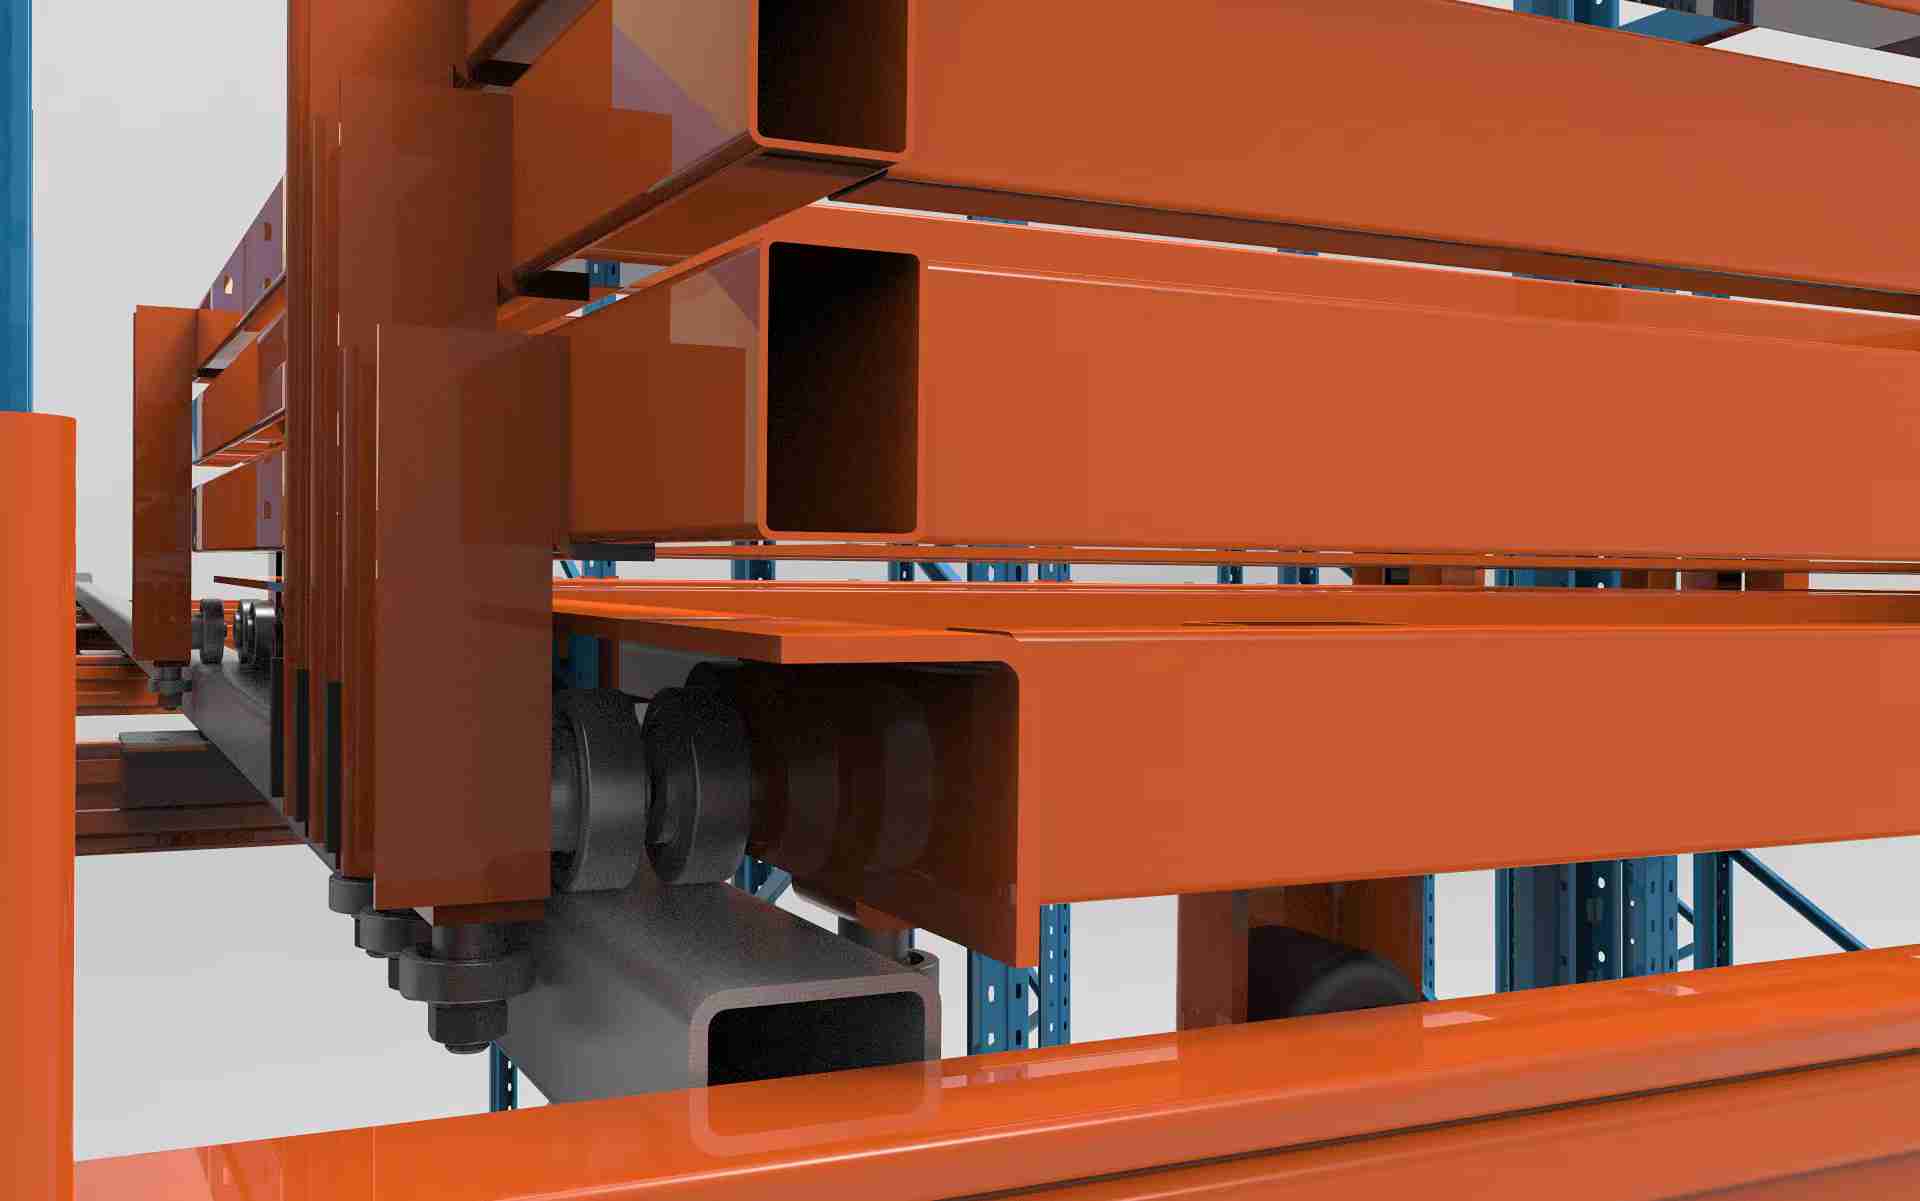
You cannot master the whole without understanding the parts. The final push back racking dimensions of a complete bay are the sum of its meticulously engineered components, each playing a non-negotiable role. The upright frames form the vertical backbone of the system; their depth and column spacing are the first variables in the push back racking dimensions equation. Beams, mounted horizontally between these uprights, provide the supporting ledge for the entire dynamic mechanism. The real magic, however, lies in the inclined rails and the wheeled carts that traverse them. These carts are not all identical; their design, wheel type, and nesting mechanism are calibrated based on expected load weights, directly influencing the overall system’s push back racking dimensions.
The precise angle of inclination—a factor often overlooked by amateur designers—is a critical science in itself, dictating the gravitational force that moves the loads and ensuring that pallets roll smoothly without gaining dangerous momentum. Every single component, from the thickness of the beam to the diameter of the cart’s wheels, is a contributing factor to the final, optimal push back racking dimensions.
The Master Calculation: A Forensic Look at The Five Pillars of Push Back Racking Dimensions
Arriving at the perfect push back racking dimensions requires a holistic approach that balances five interdependent pillars. Ignoring one to favor another will inevitably lead to compromise and failure.
Pillar 1: Pallet Specifications – The Non-Negotiable Foundation
Any discussion about push back racking dimensions must begin and end with the pallet. However, savvy warehouse engineers know that using the nominal “48×40” specification is a recipe for disaster. The real-world push back racking dimensions must account for the actual, measured size of your pallets, including their inevitable variances and condition. A warped wooden pallet can be several inches wider or longer than its stated size, instantly rendering theoretically sound push back racking dimensions obsolete. Furthermore, the concept of pallet overhang is paramount.
This refers to the exact amount the pallet extends beyond the front and rear load beams. The goal is a “Goldilocks” zone: enough overhang (typically 3-4 inches) to ensure the pallet clears the beam structure during movement but not so much that it becomes unstable and risks tipping. This overhang measurement is the anchor point from which all other push back racking dimensions are derived.
Pillar 2: Bay Width – The Delicate Balance of Space and Stability
The bay width, the clear interior distance between two upright frames, is a dimension of delicate compromise. This specific aspect of push back racking dimensions is a tightrope walk between two hazards. A bay that is too narrow based on miscalculated push back racking dimensions will cause pallets to bind against the uprights, creating friction, damaging both the product and the racking, and frustrating forklift operators.
Conversely, a bay that is too wide, due to overly generous push back racking dimensions, allows pallets to shift laterally during the push-back process. This lateral movement can misalign the carts, potentially leading to derailment and a complete system shutdown. The science of determining the correct bay width involves the pallet width, a tolerance for variance, and a safety factor for operator error, making it a cornerstone of reliable push back racking dimensions.
Pillar 3: Bay Depth – The Most Complex Variable in Push Back Racking Dimensions
This is the heart of the matter. The bay depth is the dimension where amateur calculations fail spectacularly. It is categorically not simply (Pallet Length) multiplied by (Number of Deep Positions). True, accurate push back racking dimensions for depth are a complex aggregate of several factors: the physical length of each nested cart, the operational clearance needed between those carts when nested, the length of the inclined rails, and—most critically—a safety and operational clearance at the very back of the system.
This rear clearance is the buffer that prevents the rearmost cart from violently impacting the upright frame, which is a common point of failure in poorly designed systems. For a system that is four pallets deep, the total push back racking dimensions for depth will always be greater than the sum of four pallet lengths. This extra space is not wasted; it is the essential “working room” that allows the mechanics of the system to operate as intended. Overlooking this is the most common error in planning push back racking dimensions.
Pillar 4: Vertical Height – Optimizing the Cubic Capacity
The vertical push back racking dimensions are your primary lever for maximizing storage density. However, maximizing height is not about recklessly building to the ceiling. The calculation for vertical push back racking dimensions is a complex trifecta of building constraints, equipment capabilities, and safety protocols. You must first know your clear ceiling height, measured from the finished floor to the lowest overhead obstruction—be it a sprinkler line, light fixture, or ductwork.
Then, you must reconcile this with the maximum lift height of your forklifts while carrying a load. Finally, and most importantly, you must incorporate stringent safety clearances: a minimum of 6-12 inches between the top of the highest stored load and the obstruction above, and adequate vertical space between beam levels to allow for safe forklift operation and pallet placement. These vertical push back racking dimensions require precision, as a misstep can either leave valuable air space unused or create a dangerous situation for both man and machine.
Pillar 5: Aisle Width – The Operational Artery of the Warehouse
No component of push back racking dimensions has a more direct impact on daily workflow than aisle width. This dimension defines the operational artery for your material handling equipment. Unlike systems that require specialized narrow-aisle forklifts, push back is designed for standard counterbalance forklifts. Therefore, the push back racking dimensions for aisles must account for the full maneuvering envelope of the truck.
This includes the space needed for the forklift to approach the rack squarely, the length of the forks themselves, the mast’s tilt function, and the turning radius required to enter and exit the aisle without collateral damage. The aisle width in your push back racking dimensions is a direct function of your specific forklift model’s specifications. Using a generic number guarantees inefficiency. Getting these push back racking dimensions correct ensures smooth, fast, and safe traffic flow, directly impacting your warehouse’s overall throughput.
From Theory to Practice: The Free Push Back Racking Dimensions Calculator
Understanding the theory behind push back racking dimensions is one thing; applying it to your unique warehouse environment is another. Manual calculations are prone to human error and cannot easily account for the interplay of all variables. This is why our team of engineers has developed a powerful, cloud-based tool: the Push Back Racking Dimensions Calculator. This is not a simple spreadsheet; it is a distillation of our decades of field experience and engineering expertise into an accessible software solution.
This advanced tool does the heavy lifting for you. By inputting your specific data—exact pallet dimensions, target number of pallets, desired depth, forklift make/model, and clear ceiling height—the algorithm processes thousands of data points against a library of industry-standard component push back racking dimensions. In moments, it generates a comprehensive report that provides not just numbers, but a viable blueprint.
You receive a detailed breakdown of the optimal push back racking dimensions for your project, a 3D visualization of the layout, the total system footprint, and the true storage capacity you can expect. It eliminates guesswork and provides a data-driven foundation for your project, ensuring the push back racking dimensions you plan with are the push back racking dimensions that will succeed.
[CTA Button: GET MY CUSTOM PUSH BACK RACKING DIMENSIONS REPORT NOW]
The Human and Operational Factors: What Happens After the Push Back Racking Dimensions Are Set
Even the most perfectly engineered push back racking dimensions can be undermined by two critical factors: the human element and integration failures. The best push back racking dimensions are useless without proper forklift operator training. Operators must be trained on the unique mechanics of a push back system—how to place loads gently to avoid jarring impacts, how to retrieve loads smoothly to manage the gravity-fed movement, and how to identify early warning signs of a problem. Furthermore, the push back racking dimensions must be integrated into a larger ecosystem. How does the system interface with your AGV pathways or conveyor systems?
Is your Warehouse Management System (WMS) configured to understand the FIFO flow and depth of the system? The push back racking dimensions are the hardware, but your processes and people are the essential software that makes it all work.
Case Study: Precision Push Back Racking Dimensions Rescue a Failing Distribution Center
A national pharmaceutical distributor approached us in a state of crisis. A newly installed push back system, designed by a general contractor, was operational on paper but a disaster in practice. Their throughput had plummeted by 40%, and they had experienced three separate incidents of pallet collapse in a single month. Our audit revealed that the root cause was entirely rooted in flawed push back racking dimensions.
The bay depth was too shallow, eliminating the crucial rear safety clearance and causing immense pressure on the rear uprights. The aisle width was calculated for a smaller, obsolete forklift model, not the trucks they actually used, leading to widespread beam damage. We halted operations and conducted a full site survey.
Using our proprietary methodology for push back racking dimensions, we redesigned the entire layout. We specified a 7-inch increase in bay depth and a 14-inch widening of the aisles. The results were transformative. Within 48 hours of the re-installation, the system was operating flawlessly. Throughput not only recovered but exceeded previous levels by 15%. More importantly, safety incidents dropped to zero. This case underscores a vital lesson: there is no substitute for precision push back racking dimensions.
Conclusion: Engineering Certainty into Every Square Inch
In the world of industrial storage, hope is not a strategy. Relying on approximations or outdated rules of thumb for your push back racking dimensions is an enormous financial gamble. The path to warehouse efficiency and safety is paved with data, precision engineering, and a deep respect for the physics of your storage system. Your push back racking dimensions are the DNA of your operation—they determine its health, its efficiency, and its potential for growth.
By embracing the complexity and adhering to the engineering principles outlined in this guide, you can move from a cycle of failure and frustration to a state of optimized performance. Utilize the free calculator to start your journey with certainty, and when you are ready to build a system with guaranteed performance, partner with engineers who live and breathe push back racking dimensions. Let’s build a warehouse that works as hard as you do.
Frequently Asked Questions (FAQs)
Q1: How often should we conduct a physical audit of our push back racking dimensions to ensure ongoing safety?
We recommend a formal, documented inspection of the entire system, focusing on the integrity of all push back racking dimensions, at least biannually. This should be performed by a trained inspector who checks for any beam deflection, upright alignment, cart wheel wear, and any signs of impact that may have altered the critical push back racking dimensions. Additionally, a quick visual check for any obvious shifts or damage should be part of the forklift operators’ daily routine.
Q2: Can we modify existing push back racking dimensions to store a new, slightly larger pallet size?
This is a complex and potentially hazardous undertaking. The push back racking dimensions of an installed system are an integrated whole. Changing one dimension, like bay width or depth, often requires changing multiple components (beams, rails, carts) in unison. It is not as simple as just moving the upright frames. Such a modification must be designed and approved by a qualified rack engineer to ensure the structural integrity and dynamic functionality of the entire system is maintained. Never attempt to modify push back racking dimensions without professional consultation.
Q3: Do the push back racking dimensions change if we are storing plastic pallets instead of wood?
Yes, absolutely. This is a crucial consideration. Plastic pallets often have different friction coefficients and rigidity compared to wood. They may also have different standard sizes and overhang characteristics. The push back racking dimensions, particularly the rail incline angle and the cart wheel type, may need to be adjusted to accommodate the different slip/stick behavior and weight distribution of plastic pallets to ensure consistent and smooth operation.
Q4: What role does the warehouse’s geographical location (e.g., seismic zone) play in determining final push back racking dimensions?
In high seismic zones, the structural requirements for all racking systems, including push back, are significantly more stringent. The final push back racking dimensions will be influenced by the need for heavier-gauge steel, different upright frame designs, and potentially altered bay widths and depths to accommodate larger bracing and achieve the necessary stability. This is not a DIY calculation; it requires the work of a professional engineer licensed in that state or region.
Q5: How do we accurately factor in our forklifts’ dimensions when calculating the aisle width component of our push back racking dimensions?
The most accurate method is to obtain the official “operational dimensions” diagram from your forklift manufacturer’s spec sheet for the exact model you operate. This diagram provides the key measurements for turning radius, overall length with forks, and mast dimensions—all with the load elevated to its maximum height. These precise numbers, not estimates, must be used in the final calculation for the aisle width within your push back racking dimensions plan. Using anything less is a gamble.
Welcome to contact us, if you need warehouse rack CAD drawings. We can provide you with warehouse rack planning and design for free. Our email address is: jili@geelyracks.com